自带的RMI
定义三个module,分别为 api、client、server。
其中api提供Bean及接口,server实现接口,client调用接口。从而实现client调用server。
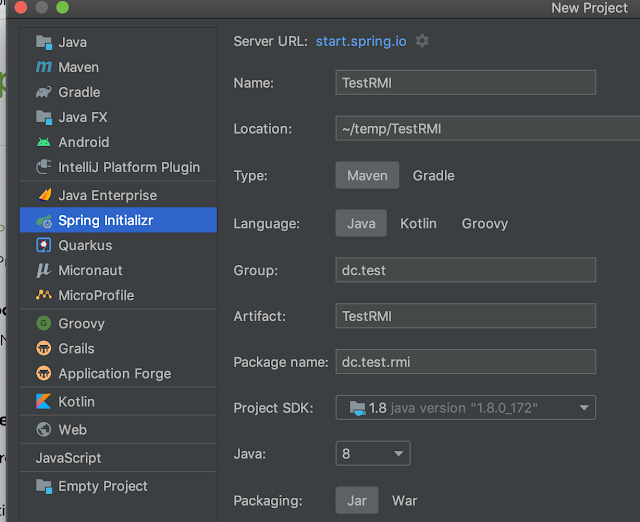
TestRMI -> Spring Web项目
配图1,项目基本配置
报错 Remote host terminated the handshake.看起来是网络问题
关掉本地代理,用路由器代理就好了。。。。
打开项目,是一个默认的spring web结构,配图2
删掉各种目录,只留 .idea、pom、iml这仨文件即可。
然后新建module:api、server、client。
子项目直接用脚手架创建,配图3
1,api 定义接口及Bean
如 UserBean implements Serializable,需要实现序列化
及interface IUserService.
public interface IUserService {

    /**
     * 获取用户根据ID
     *
     * @param userId 用户ID
     * @return UserBean
     */
    UserBean findUserById(Integer userId);

}
2,Service实现
service 模块,实现api中接口,添加@Service注解
import org.springframework.stereotype.Service;

@Service
public class UserServiceImpl implements IUserService {

    @Override
    public UserBean findUserById(Integer userId) {
        UserBean bean = new UserBean();

        String name = "默认用户";
        switch (userId) {
            case 1:
                name = "张三";
                break;
            case 2:
                name = "李四";
                break;
            case 3:
                name = "王五";
                break;
            default:
                break;
        }

        bean.setId(userId);
        bean.setName(name);

        return bean;
    }
}
定义RMI Config, 用于对外暴露
import org.springframework.beans.factory.annotation.Autowired;
import org.springframework.context.annotation.Bean;
import org.springframework.context.annotation.Configuration;
import org.springframework.remoting.rmi.RmiServiceExporter;

@Configuration
public class RmiConfig {

    @Autowired
    private IUserService userService;

    @Bean
    public RmiServiceExporter serviceExporter() {
        RmiServiceExporter exporter = new RmiServiceExporter();
        exporter.setService(userService);
        exporter.setServiceInterface(IUserService.class);
        exporter.setRegistryPort(2022);
        exporter.setServiceName("userService");
        return exporter;
    }
}
定义启动类
@SpringBootApplication
public class ServerApplication {

    public static void main(String[] args) {
        SpringApplication.run(ServerApplication.class, args);
    }

}
resource.yaml中,配置启动端口
3,client中调用
定义调用业务
@Component
public class UserClient implements CommandLineRunner {

    @Autowired
    private IUserService userService;

    @Override
    public void run(String... args) throws Exception {
        System.out.println("用户1 is " + userService.findUserById(1));
        System.out.println("用户2 is " + userService.findUserById(2));
        System.out.println("用户3 is " + userService.findUserById(3));
        System.out.println("用户4 is " + userService.findUserById(4));
    }
}
获取rmi中暴露的Service
@Configuration
public class RmiConfig {


    @Bean(name = "userService")
    public RmiProxyFactoryBean proxyFactoryBean() {
        RmiProxyFactoryBean bean = new RmiProxyFactoryBean();
        bean.setServiceUrl("rmi://127.0.0.1:2022/userService");
        bean.setServiceInterface(IUserService.class);
        return bean;
    }

}
定义启动类
@SpringBootApplication
public class ClientApplication {

    public static void main(String[] args) {
        SpringApplication.run(ClientApplication.class, args);
    }

}
修改端口为8082
4,运行
先启动Service,后启动client
用户1 is UserBean{id=1, name='张三'}
用户2 is UserBean{id=2, name='李四'}
用户3 is UserBean{id=3, name='王五'}
用户4 is UserBean{id=4, name='默认用户'}
获取成功。
可以说是一个非常简单的demo了。。。。
对微服务的理解还是有一定帮助的。。。。
senRsl
2022年06月09日17:29:22


没有评论 :
发表评论